Pink Monochromatic Makeup Routine Using MAKE UP FOR EVER


There are many ways to rock a monochromatic makeup look. You can go bold, neon, or simply match neutral shades across your eyes, cheeks and lips with a multitasking product. 

Whatever you choose, you can be sure that the result will be super cohesive and pulled together. 

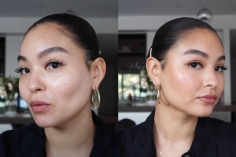
In this routine Elena Anastasiou, our Assistant Brands Manager and MUA has put together a glowy, pink monochromatic look with an impressive range of MAKE UP FOR EVER favourites


Try this routine and introduce yourself to MAKE UP FOR EVER’s pro makeup range

Pro Makeup Tips:

  • Mix a highlighter in with your go-to primer for a glowy makeup base.

  • The area under your eye is extremely delicate, so when you’re blending in concealer with your fingers try using your ring finger, as it is the least powerful and gives a brilliant result. 

  • MAKE UP FOR EVER creates customisable palettes, so you can choose multiple products that will help you build this monochromatic look. 

MakeUpForEver LetsGoldPalette 0013 MakeUpForEver LetsGoldPalette 0013

What is Monochromatic Makeup?

As seen in editorials and on red carpets, monochromatic makeup is a method where the makeup used on the eyes, cheeks and lips is kept in the same colour family or hue. 

This can be done to match to then also your outfit, or achieved simply by sweeping the same multitasking product all over the face. 

Either way, the result is a co-ordinated look that stands out. Even though you’re using the same colour it will look different on each part of your face, and will help the look feel put together.

This routine shows you how to use these highly rated MAKE UP FOR EVER products to achieve this simple, but gorgeous effect.

Step 1: Glow up your hydrating primer

Step 1: Glow up your hydrating primer

To start off this look, mix a drop of the MAKE UP FOR EVER Ultra HD Soft Light Liquid Highlighter in with the MAKE UP FOR EVER Nourishing Primer and apply to the skin for a radiant finish.

Step 2: Apply your holy grail concealer

Step 2: Apply your holy grail concealer

Using the MAKE UP FOR EVER ULTRA HD CONCEALER, apply several dots of concealer under the eye and one on the eyelid. This will correct any darkness and create a good base for shadows on the lid. Then, blend in the product with your fingers or with the Real Techniques Miracle Complexion Sponge. This is a self setting and light reflecting concealer, so you don't have to follow up with powder.

Step 3: Match it to your foundation

Step 3: Match it to your foundation

Using the Real Techniques Expert Face Brush apply the MAKE UP FOR EVER Ultra HD Foundation starting in the centre of your face, buffing outwards, blending as much as possible. Stipple the product on with a Kabuki brush in areas you want more coverage.

Step 4: Adjust your finish with a powder

Step 4: Adjust your finish with a powder

Set in your makeup or add a bit of colour with the MAKE UP FOR EVER Matte Velvet Skin Blurring Powder Foundation, using the Real Techniques Powder Brush to blend it in using circular motions. For a dewy finish only add to areas you want to reduce shine and prevent creasing like your under eye area, forehead and chin.

Step 5: Define your cheekbones

Step 5: Define your cheekbones

Using a MAKE UP FOR EVER Artist Face Color, create a subtle shadow under your cheekbones with a small contour brush. Use the brush to mimic a three shape on the edges of your face.

Step 6: Warm up the crease

Step 6: Warm up the crease

Using a neutral shade from the Make Up For Ever Let's Gold Eye Palette, blend the shade into the crease using circular motions. This will help the next colour you apply in your crease blend properly. 

Step 7: Try a monochromatic multitasker

Step 7: Try a monochromatic multitasker

Using the versatlie MAKE UP FOR EVER Artist Lip Blush, apply a small amount of the product directly to your eyelid, drawing it straight across your crease. Then, blend this creamy formula out using the M.A.C Cosmetics 217S Blending Brush until the colour is diffused. 

Step 8: Add dimension and luminosity

Step 8: Add dimension and luminosity

Add a subtle shimmer and shine to your look using a high shine highlighter like the M.A.C Cosmetics Extra Dimension Skinfinish. Apply it to the bottom of your eyelid along your lash line for a subtle glow. You can also use this shade as a highlighter on your cheekbones, nose and browbones.

Step 9: Build up your brows

Step 9: Build up your brows

Sculpt your brows using the IT Cosmetics Brow Power Universal Eyebrow Pencil, creating hair like strokes. Brush your brows down to discover sparse areas you may be missing. Then, brush the product through with the spooly.

Step 10: Lift your lashes with a waterproof formula

Step 10: Lift your lashes with a waterproof formula

Use the MAKE UP FOR EVER Aqua Smoky Lash Mascara to build volume and length, zig zagging it up you lashes, making sure to coat every single one. 

Step 11: Coordinate your blush colour

Step 11: Coordinate your blush colour

Using the MAKE UP FOR EVER Artist Face Color in B206, apply the blush to your cheeks in a sweeping motion, starting at the apples of your cheeks. You can concentrate a bit of the colour on your apples for an extra pop of colour.

Step 12: Add a little extra glow

Step 12: Add a little extra glow

Using the same white or gold highlighter, gently add it along the top of your blush and bronzer to give an extra radiant look. Add a small amount along the nose and the top of the lip, or the 'cupids bow'. Then add a small amount along the brow bone. This will pick up the light and make your face glow.

Step 13: Now, pair it with a pink lip

Step 13: Now, pair it with a pink lip

Complete your look with a dash of luscious colour and hydration using the MAKE UP FOR EVER Lip Booster in Cinema.

The Final Look:

Pink Monochromatic Makeup Routine Using MAKEUP FOREVER - Adore Beauty Staff, Elena Anastasiou - AFTER Pink Monochromatic Makeup Routine Using MAKEUP FOREVER - Adore Beauty Staff, Elena Anastasiou - AFTER


A Makeup Artist's Advice On How To Get Glowy, Dewy Skin

Before you start your glowy makeup look, why not try this skincare routine for radiant skin?

Our Go-to Dewy Makeup Look Using Giorgio Armani Luminous Silk

Try a subtle and sophisticated glow up with this L’Oreal Australia makeup routine from Ross Andrewartha

A Simple Daily Makeup Routine Using Bobbi Brown Cosmetics

Kheahni Jackson from Bobbi Brown Cosmetics, Australia shows us how to Prep + Correct + Perfect your everyday base, brightening the undereye and leaving your skin looking fresh.

    Subscribe for beauty sales, free goodies, advice and SO much more!